
Why this?
Technical Artists come from different backgrounds, but the two main ones are usually computer science and art. Both excel in different parts of game production. While artist-background TAs may not always go as deep into code as their more technical counterparts, in my years working in AAA I have seen the same problem again and again: Technical Artists who overload their tools with options, creating monsters that artists cannot really control. At that point, the tool stops being a tool and becomes a constant stream of calls to the TA team to “fix” it.
I think the foundation of a good landscape material should be built with the artist in mind. It should be easy to use and extremely simple. Every option in the material should be something the average artist will use again and again, and it should be understandable immediately. The rest of the fancy and cool effects should be extras, added later if the artist requires them.
That was the mentality behind this material when I started working on it. I wanted to create the skeleton of a landscape material that a AAA studio could realistically use in an open-world pipeline. The material is modular and easy to expand. It currently uses two biomes and three layers per biome, but adding more layers or biomes should be a relatively simple task. More importantly, the artist should know exactly what each option is for. The material also uses a mask system to assign Physical Materials to the different layers, with the idea that they will be used later by the PCG system.
High-Level Architecture
One of the most interesting aspects of this material is the relationship between layers and biomes. The setup uses 3 layers and 2 biomes, but instead of giving each biome its own separate paint stack, the same three layers are shared across both. The workflow is simple: a base layer covers the entire landscape, and two additional variation layers are painted on top of it. A biome mask then decides whether each area resolves as Biome 1 or Biome 2.
This approach may look a bit strange in a setup with only 3 layers and 2 biomes, but this material is meant to be the base for a much larger system. Once you imagine 5 biomes with 5 layers each, this kind of structure makes a lot more sense.
The main advantage is that, by restricting how much artists can freely mix biomes and layers, the material becomes more robust and works better with the PCG system. Biomes are meant to define large areas, while the layers act as variations inside them. It is also much less intimidating for the artist, since they only have to choose between 3 to 5 layers instead of dealing with 25 different possibilities.
The biomes themselves can either be painted as a normal landscape layer or driven by a mask.
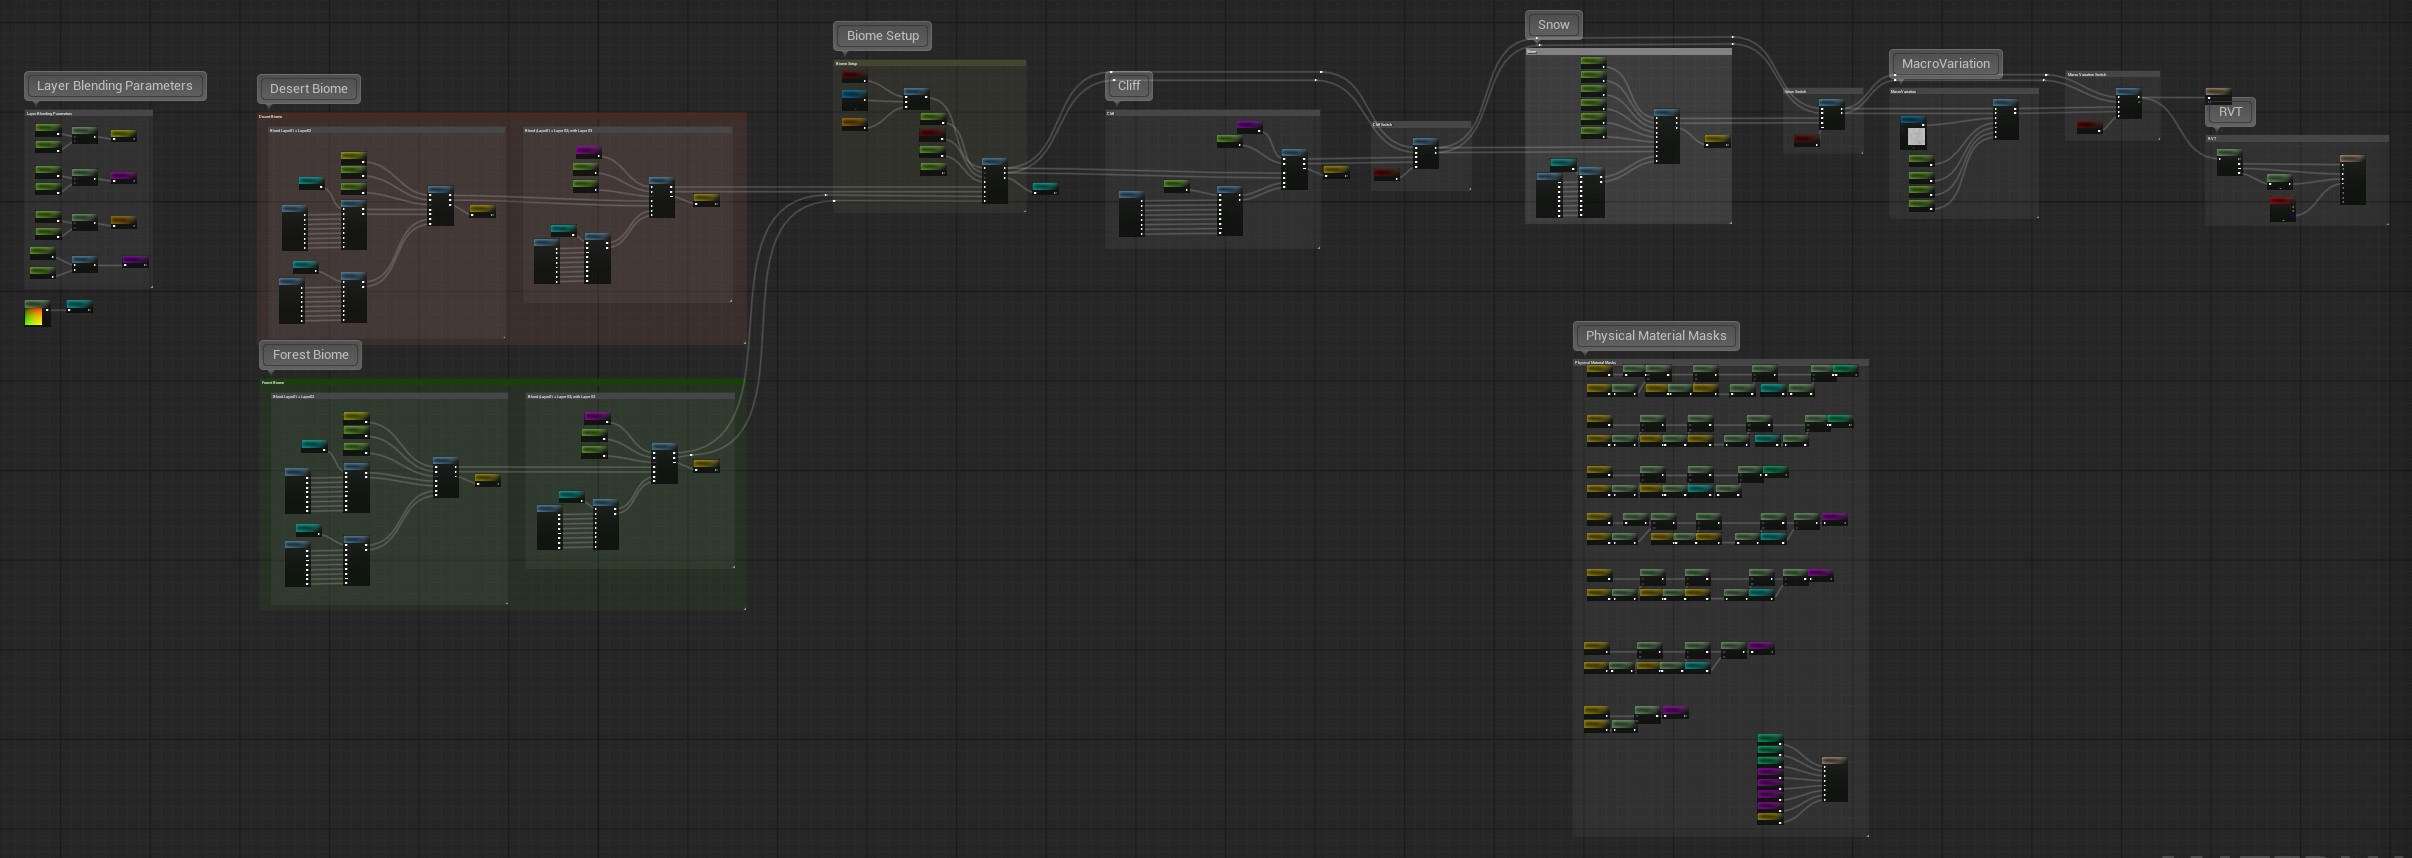
In the image above, we can see how the material is structured. Both Biome 1 (Desert) and Biome 2 (Forest) are processed first by blending the base layer with Layer 2 and Layer 3. Once both biome paths are resolved, they are blended together using the biome layer or biome mask. After that, the material applies the optional cliff layer based on slope, followed by the optional snow layer based on both slope and height. The final step in the main chain is the macro variation pass.
There are also two sections outside the main chain. One is the RVT output, which records the final material into a Runtime Virtual Texture. The other is the mask generation section, which creates all the masks needed for the Landscape Physical Material Output. This structure keeps the material easy to expand and ensures that the same terrain logic drives the visual result, the Physical Material classification, and the RVT output.
Layer Definition and Sampling
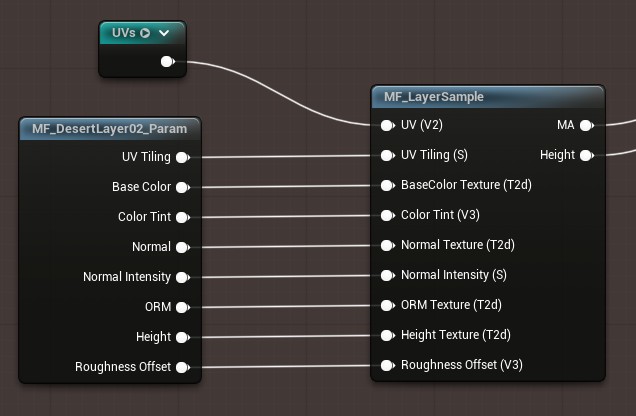
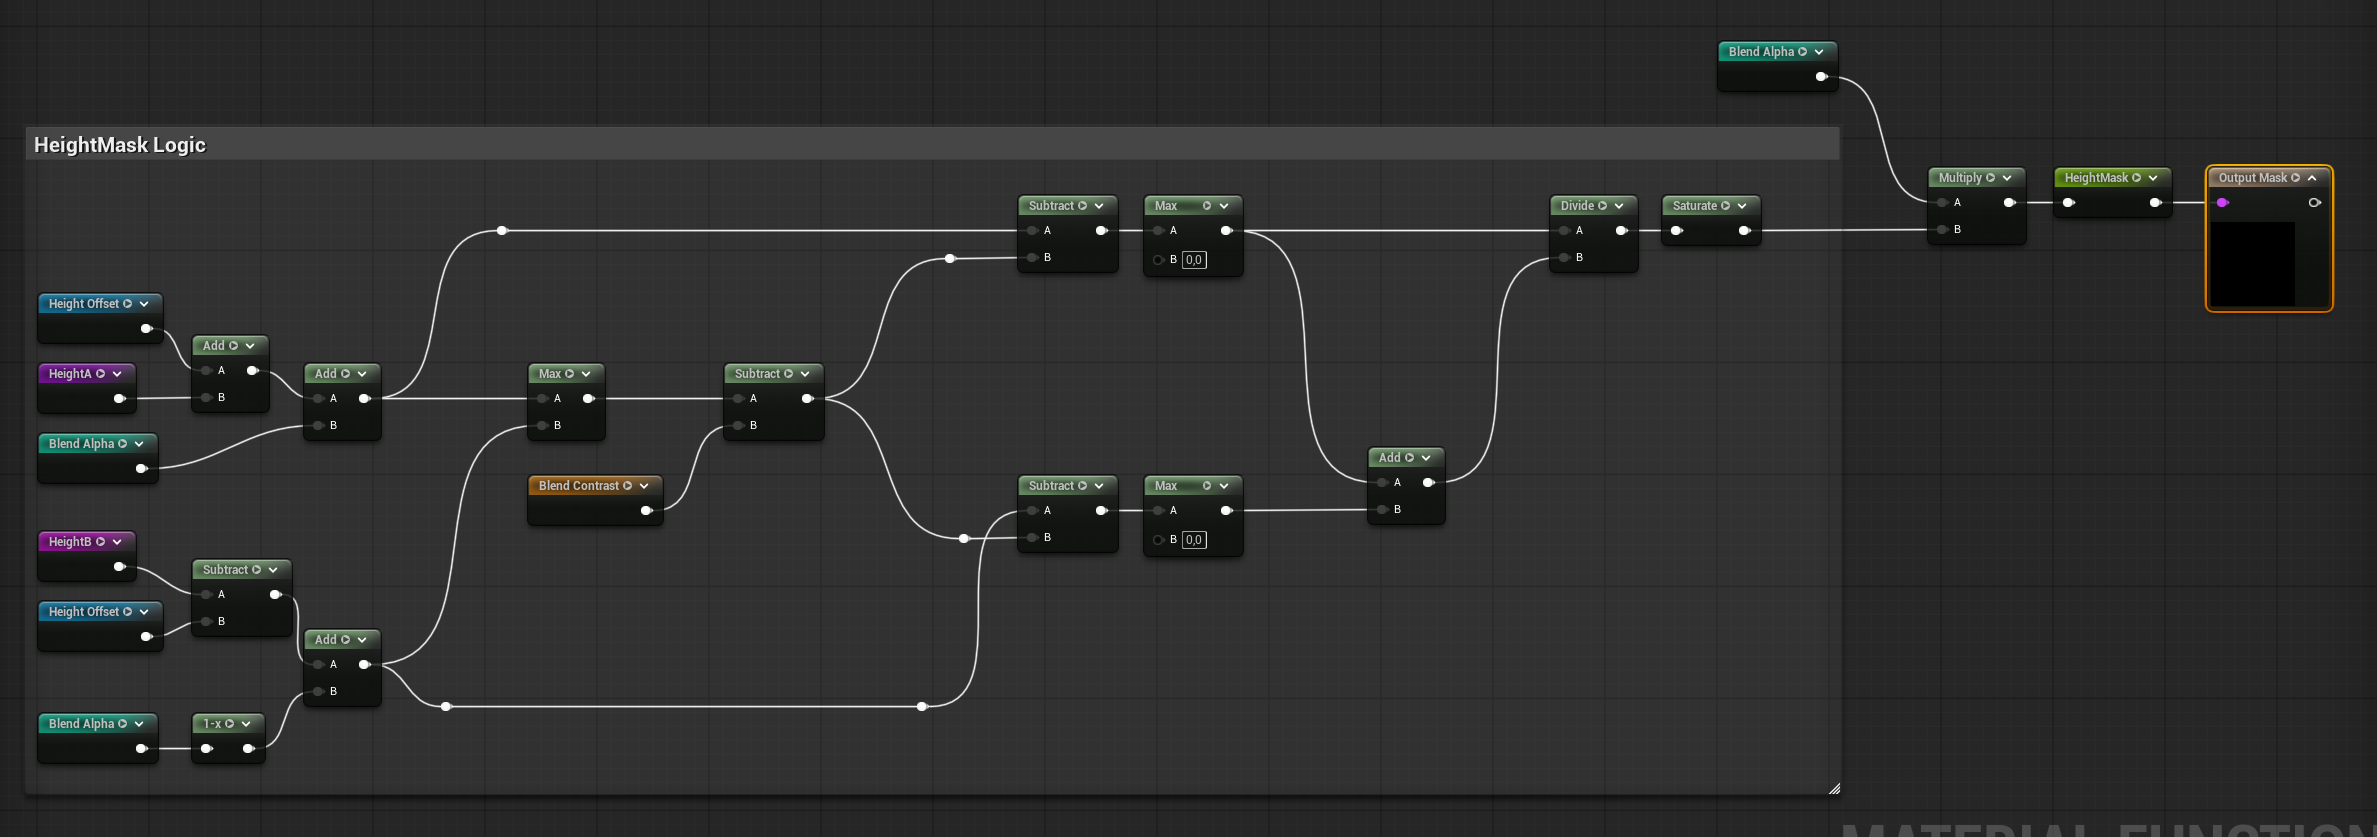
The first step was making sure every layer followed the same structure. Otherwise, as soon as you start adding more surfaces, the graph gets messy for no good reason. In this material, every layer uses the same texture set: Base Color, Normal, ORM, and Height, and every one of them exposes the same core controls like UV tiling, normal intensity, roughness offset and color tint. The idea is simple: if you understand one layer, you basically understand all of them.
To keep that organized, each layer has its own parameter function, I know that Epic don’t want you to put parameters into functions, but I think it is a very good idea to standardize the inputs. That way if I want to add a new layer or set of textures for some reason, I only have to duplicate the parameter functions and change the names and everything is cleaner.
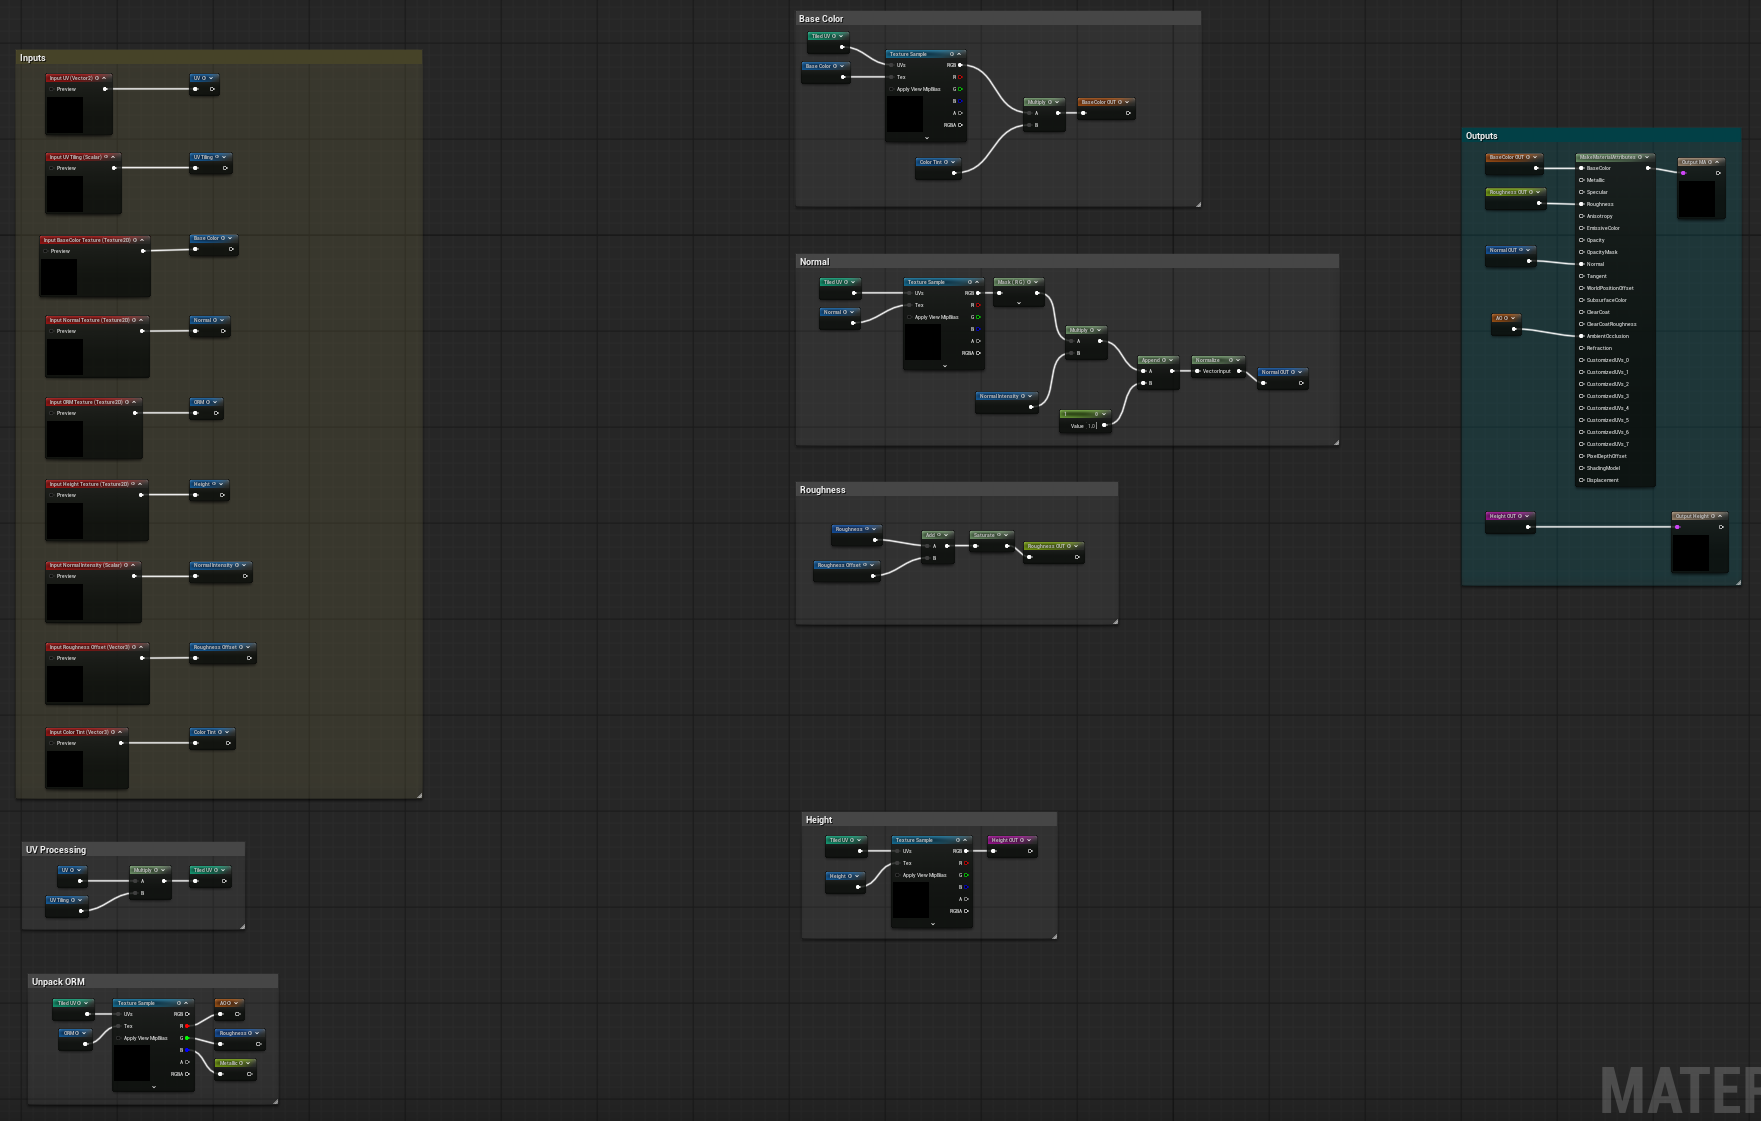
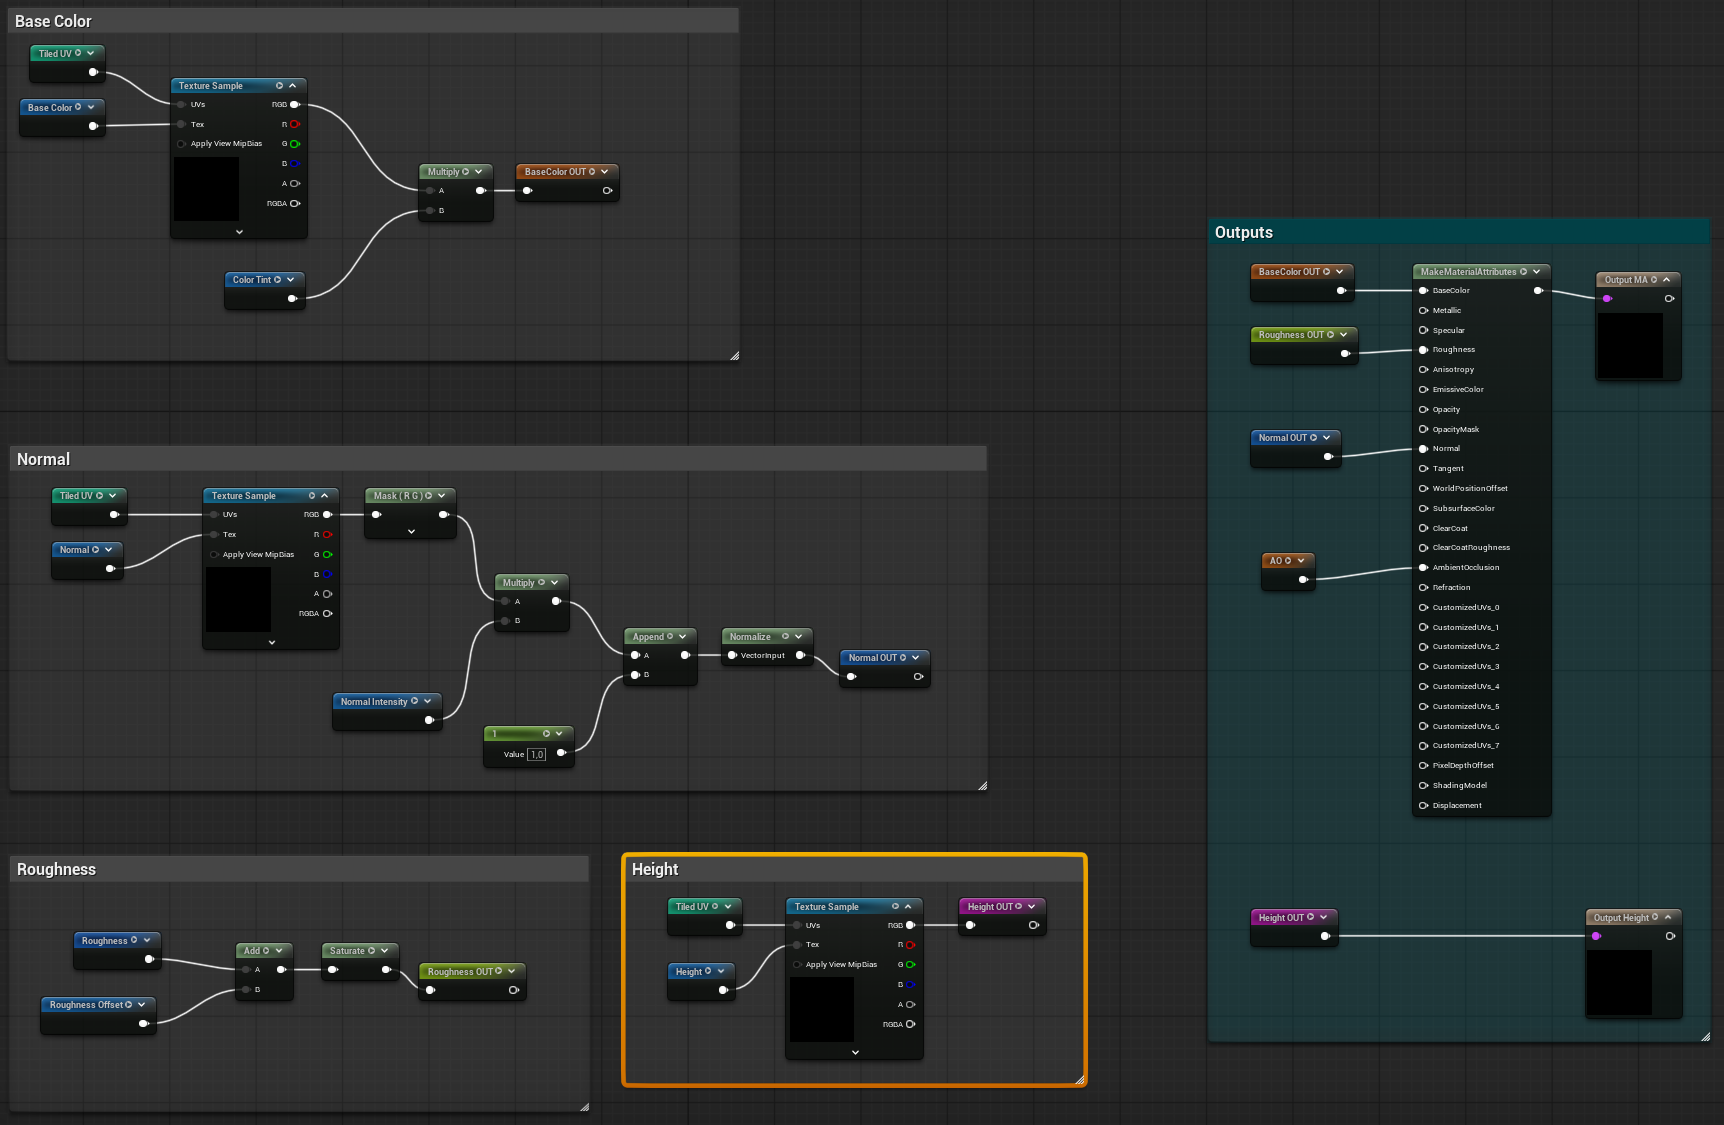
The Parameter function plugs directly to MF_LayerSample. That function is just the common sampling step: it reads the textures, applies the controls, packs the result into Material Attributes, and outputs the height separately. Doing it this way makes adding or adjusting layers much easier, because you are not rebuilding the same logic every time. You just follow the same setup again.
So this part of the material is really just about building a clean base. Before getting into biome blending, cliffs, or snow, I wanted every layer to behave in a predictable way and use the same logic. That makes the rest of the graph much easier to build on top of.
Blending and Surface Resolution
Once all the layers are sampled, the next step is deciding how they are actually combined. In this material, that job is handled mostly by two functions: MF_HeightBlend and MF_BiomeBlend. They are not doing exactly the same thing, but the idea behind both is very similar. In both cases, the function takes two already-built surfaces and blend them into a single result. One is used for blending layer variations inside a biome, and the other is used for blending the two biome results into one final base surface.
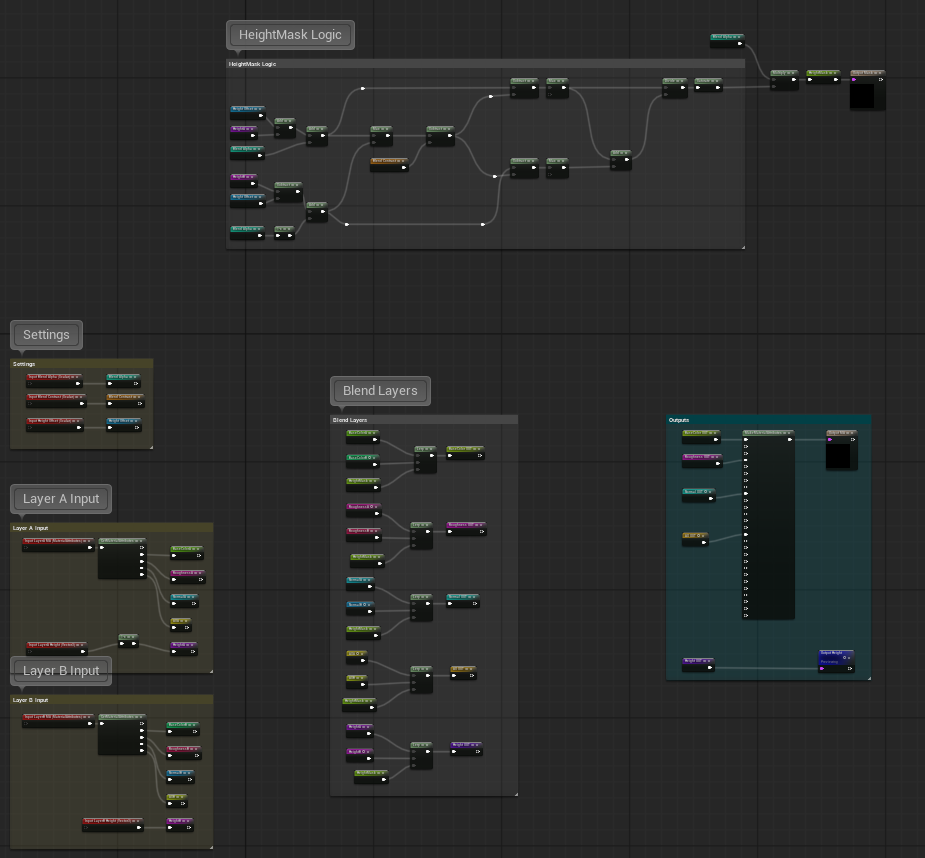
MF_HeightBlend is really the workhorse here. It is the function used all over the material to blend complete layer results using height-aware logic instead of just doing a flat lerp. That matters because it gives the transitions a much more natural breakup, especially when mixing the base layer with the painted variations, or later when applying cliff and snow on top. The function also outputs the blend mask, which is useful later for things like Physical Material generation and debugging. A big part of making this work properly was keeping that height effect localized to the painted transition instead of letting it contaminate the whole landscape.
MF_BiomeBlend comes a bit later in the chain, once the Desert side and the Forest side have already been resolved internally. At that point the material has two full biome surfaces, and the biome mask decides how they should blend together. The function supports a cleaner standard blend, but it can also work in a height-aware way if needed. In practice, this is the step that turns the material from two parallel biome paths into one actual landscape surface that the rest of the graph can keep working on.
The biome mask itself is not especially complicated, and that is fine. Its job is simply to tell the material whether a given area should resolve as one biome or the other, either from a painted layer or from a mask texture. The interesting part is not the mask itself, but what happens once both biome paths have already been built and are ready to be resolved into a single surface.
So this section is really where the material starts becoming a proper surface instead of a collection of separate layers. First the material resolves the variations inside each biome, then it resolves both biomes into one base terrain result. After that, the automatic layers like cliff and snow can take over.
Automatic Layers
Once the base biome surface is resolved, the material moves into the automatic layers. This is the part where it stops relying only on what the artist painted and starts reacting to the landscape itself. In this setup, that means two optional layers: cliff and snow. Both sit on top of the biome result, and both can override the underlying surface when needed. That order matters, because at this point the material is no longer deciding between Desert and Forest variations, but between the final environmental conditions of the terrain.
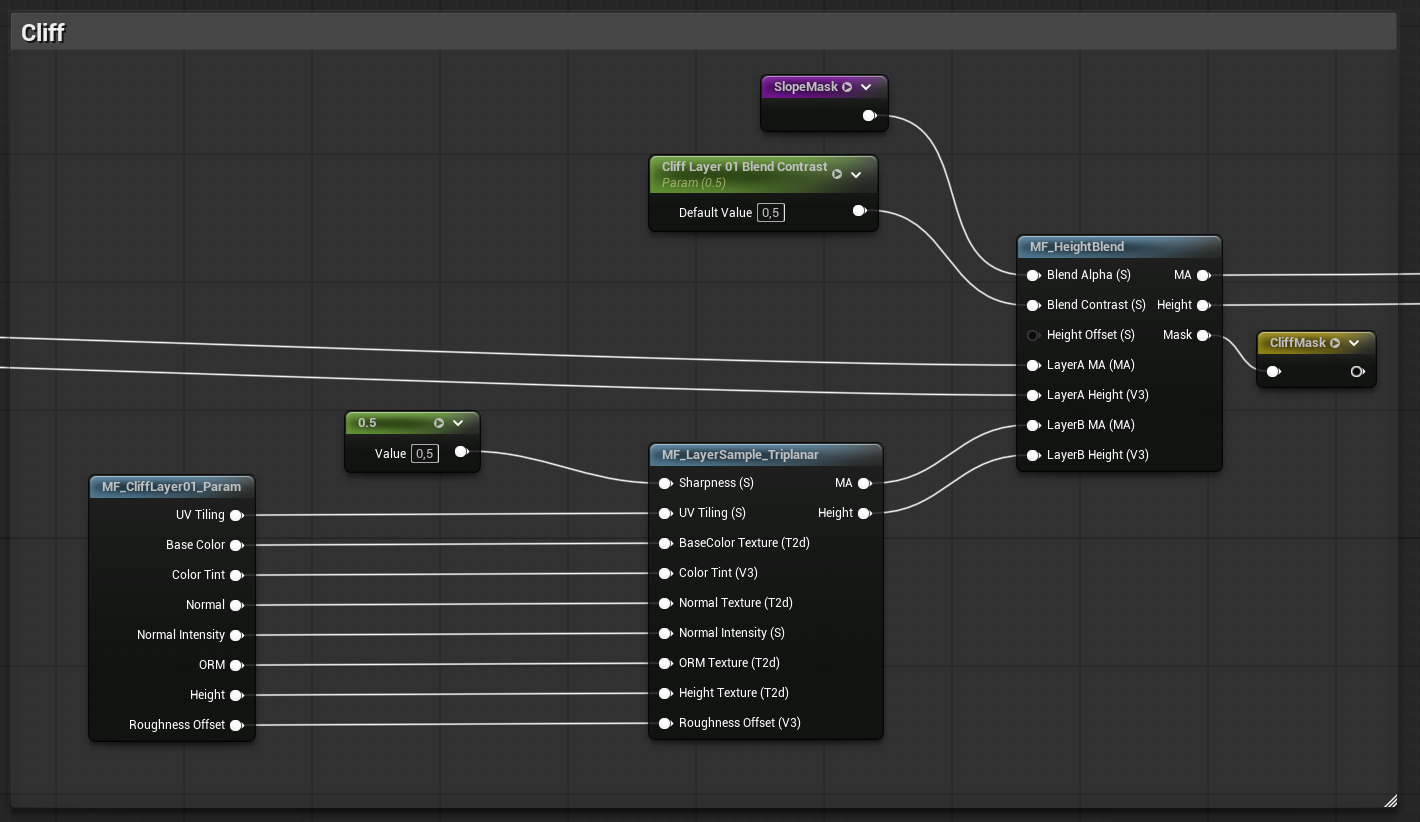
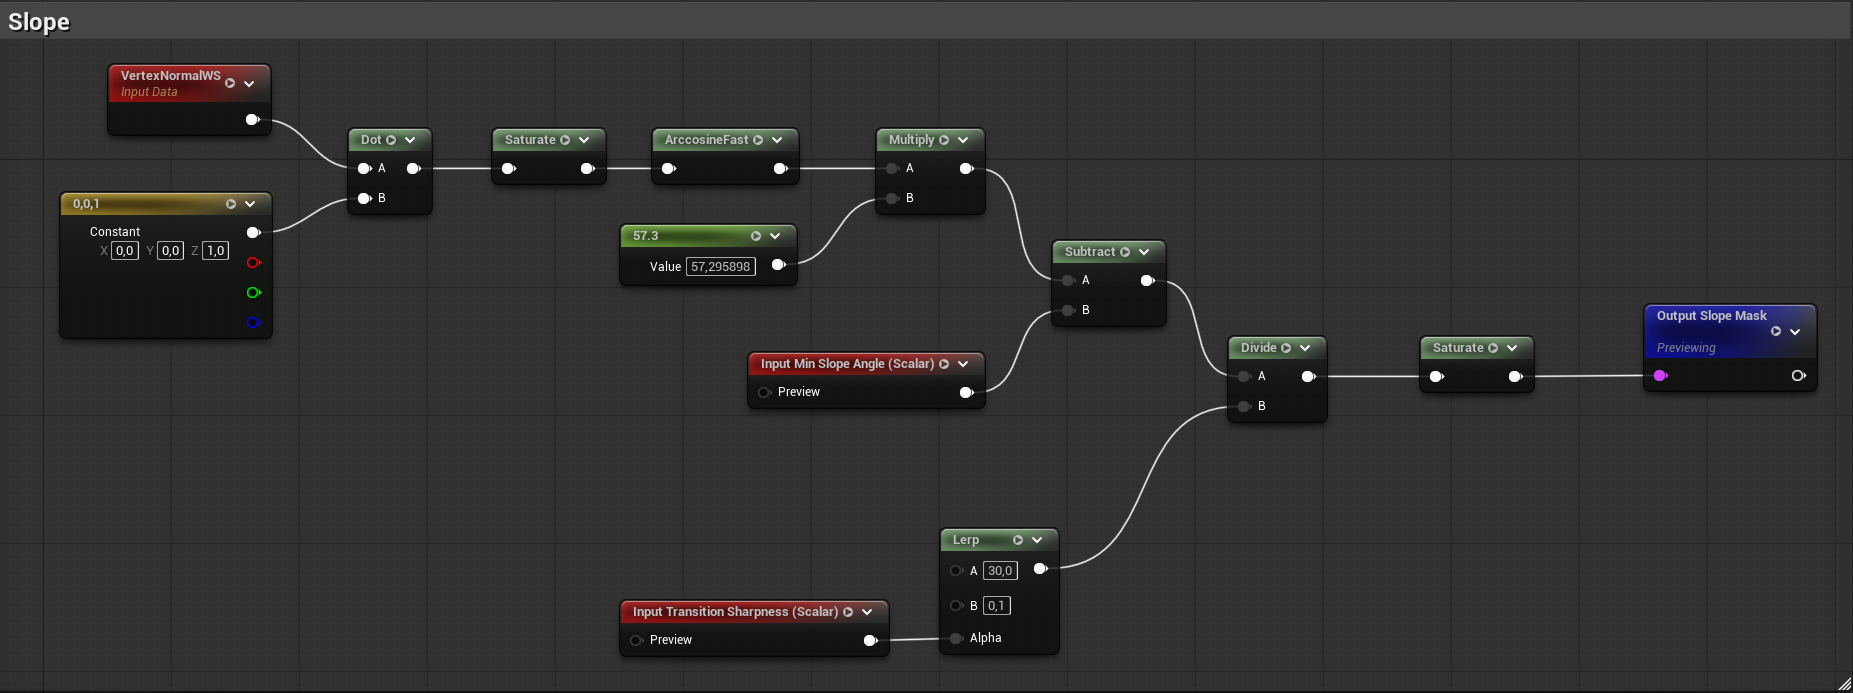
The cliff layer is driven by slope. A slope mask decides where the terrain is steep enough to stop behaving like ground and start behaving like rock. Once that mask is generated, the rock surface is projected using triplanar mapping so it does not stretch badly on steep angles. After that, it is blended back into the current terrain using the same height-aware logic as the rest of the material. The nice thing about doing it this way is that rock is not treated as a completely separate system. It is just another stage in the same material logic, which makes it much easier to control and much easier to keep consistent with the rest of the graph.

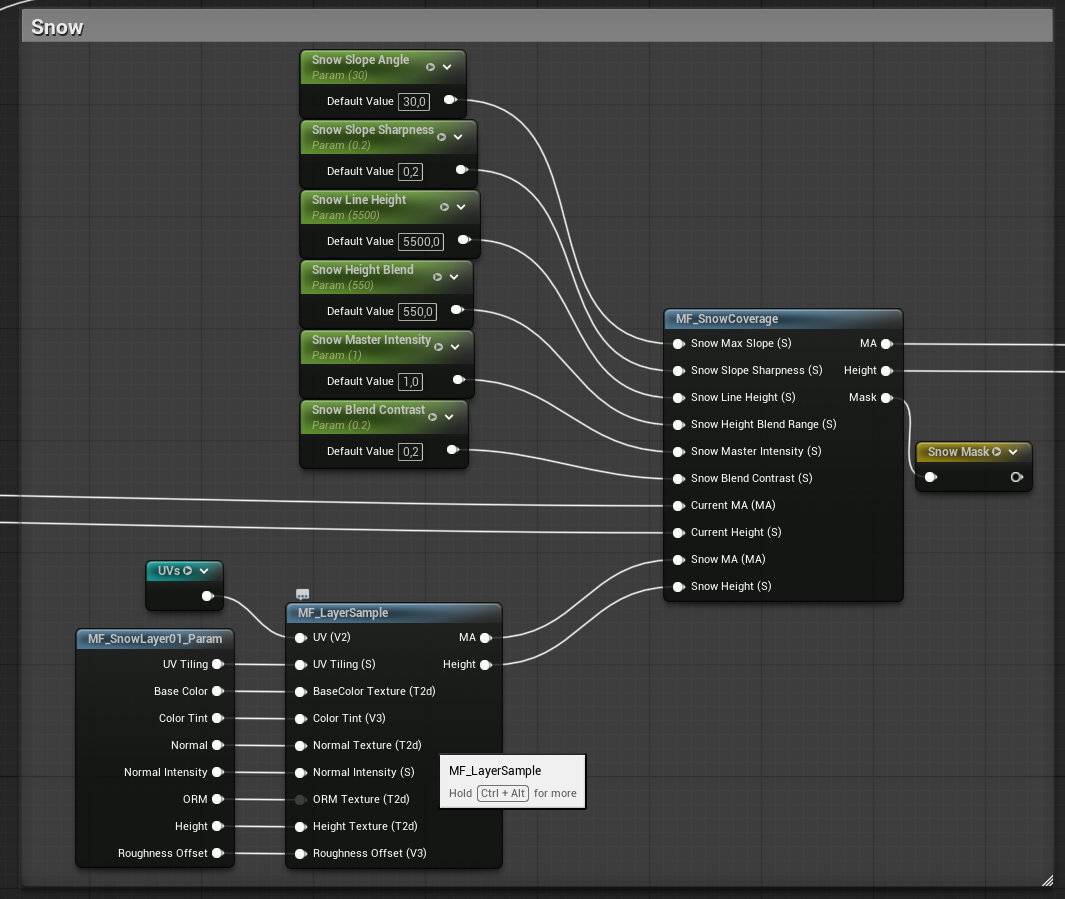
Snow works in a similar way, but with a different set of rules. Instead of just looking at slope, it also takes world height into account. The material uses a snow line, a height blend range, and slope rejection to decide where snow should build up and where it should disappear. That means snow can accumulate naturally in higher areas without covering every steep cliff face in white unless you actually want that. Again, the important part is that snow is not just slapped on with a simple lerp. It goes through its own logic and then gets applied as another proper blend stage on top of the already resolved surface.
What I like about this setup is that the automatic layers feel like natural extensions of the material instead of hacks bolted onto the side. The artist still controls the broad terrain composition through the biome and variation layers, but the material can then add the larger environmental logic on top of that. By the time this stage is finished, the terrain is no longer just a painted biome surface. It is the final resolved terrain state that the rest of the pipeline can use.